
about life
first you must live it.


How to Choose the Best Golf Towel for Hot and Humid Weather

Golf is a game of precision. Every detail matters, from the grip on your club to the condition of your ball. However, one piece of equipment gets overlooked far too often: the golf towel. In hot and humid weather, a poor towel choice can affect your grip, your club performance, and your overall comfort on the course.
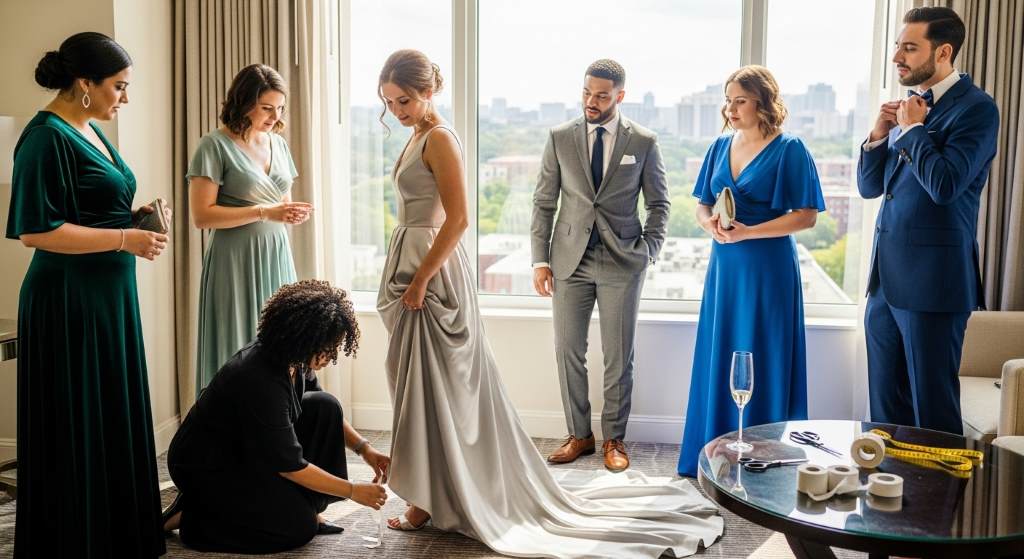
Why Wedding Guests in Atlanta, GA Prefer Temporary Hem Solutions for Gowns
Atlanta weddings continue to grow in style, size, and creativity every year. According to recent wedding industry reports, more than 2.2 million weddings take place annually across the United States, and guest spending keeps increasing with fashion costs. Many guests now look for flexible outfit solutions that save both time and money. As a result, temporary hemming for formal dresses has become a popular option among Atlanta wedding attendees. Guests appreciate practical fashion choices that work well for changing venues, humid weather, and long celebrations.
Fashion trends in Atlanta also influence how guests prepare for weddings throughout the year. Many venues feature outdoor gardens, rooftop spaces, and historic estates with uneven surfaces that make long gowns difficult to manage. Therefore, temporary hem solutions offer convenience without permanent alterations. Guests can quickly adjust dress length while protecting expensive fabrics from dirt and damage. This practical approach allows attendees to stay comfortable while maintaining an elegant appearance.
Atlanta Weddings Demand Flexible Fashion Choices
Atlanta hosts weddings in every season, and each season creates unique wardrobe challenges. Summer ceremonies often bring intense humidity and high temperatures that make floor-length gowns uncomfortable outdoors. During spring and fall, many venues include grassy lawns, cobblestone paths, and elevated terraces. Because of these conditions, temporary hem adjustments help guests move freely without stepping on fabric repeatedly. Many attendees now prioritize comfort alongside style when selecting formalwear.
Local fashion culture also encourages adaptable styling for special events. Guests often attend engagement dinners, rehearsal parties, and receptions across multiple venues in one weekend. Consequently, adjustable gowns provide more versatility for different settings and activities. Some guests even draw inspiration from trendy styling guides like what to wear to a snoop dogg concert because they value comfortable fashion that still feels bold and polished. This crossover between event fashion and practical styling continues to shape wedding guest choices in Atlanta.
Why Temporary Hem Solutions Appeal to Wedding Guests
Cost Savings Matter for Occasional Wear
Professional tailoring can become expensive, especially for gowns worn only once or twice. Many wedding guests prefer avoiding permanent alterations that limit future styling options. Temporary hems allow people to reuse the same dress with different heel heights or event themes later. As a result, guests gain more value from their wardrobe investments. This flexibility strongly appeals to budget-conscious shoppers in Atlanta.
Many people also purchase gowns online without knowing the exact fit beforehand. Since formal dresses often arrive longer than expected, temporary solutions provide quick fixes before the event date. Guests can adjust the hem at home instead of rushing to a tailor during busy wedding weekends. Therefore, temporary methods reduce stress while maintaining a polished appearance. This convenience has increased their popularity across all age groups.
Protection for Expensive Fabrics
Atlanta wedding venues frequently include outdoor elements that expose gowns to mud, moisture, and rough surfaces. Long satin, chiffon, and silk dresses can easily become damaged when dragged across grass or stone walkways. Temporary hems help lift delicate fabrics slightly above the ground during outdoor ceremonies. Consequently, guests avoid tears, stains, and frayed edges throughout the event. Protecting expensive garments remains a major reason people choose temporary alterations.
Many guests also rent designer gowns for luxury weddings in Atlanta. Rental agreements often include strict penalties for fabric damage or permanent modifications. Temporary hemming becomes an ideal solution because it leaves the original design untouched after the event. This allows renters to enjoy a custom fit without risking additional fees. Fashion rental services have further increased demand for non-permanent alterations.
Popular Temporary Hem Methods Used in Atlanta
Fashion Tape and Hem Tape
Double-sided fashion tape remains one of the simplest temporary hemming solutions for formal gowns. Guests can fold the fabric inward and secure the new hemline within minutes. This method works especially well for lightweight fabrics during short ceremonies or indoor receptions. Additionally, fashion tape travels easily in small purses for quick adjustments throughout the day. Many Atlanta guests rely on this method for last-minute styling fixes.
Heat-activated hem tape also offers a stronger hold for longer events. Guests can apply the tape with a standard iron before the wedding weekend begins. Because the process requires minimal sewing knowledge, it appeals to younger attendees and busy professionals. Temporary tapes also preserve the original gown structure after removal. This makes them practical for repeat wear and rental dresses alike.
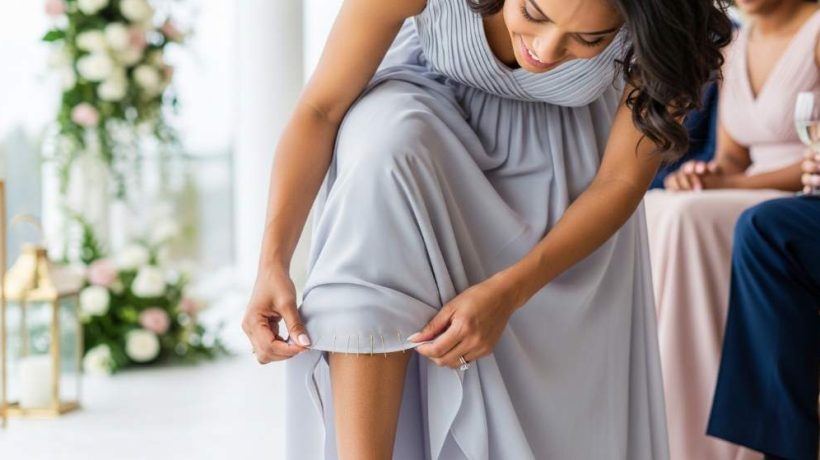
Safety Pins and Hidden Clips
Some wedding guests prefer discreet pinning methods for heavier gowns and layered dresses. Hidden clips and small safety pins can lift excess fabric without creating visible bunching around the hemline. Skilled placement helps maintain a smooth silhouette throughout photographs and dancing. Therefore, these tools remain popular for evening receptions and ballroom weddings. Many stylists in Atlanta recommend carrying backup pins for emergencies.
Modern dress clips now come in skin-tone shades and fabric-friendly materials that reduce snagging risks. These accessories provide extra security during outdoor events with strong wind or uneven terrain. Guests attending rooftop weddings especially appreciate reliable fastening methods for long gowns. Consequently, hidden clips have become common additions to wedding emergency kits. Their affordability also makes them accessible to nearly everyone.
The Influence of Atlanta’s Climate on Formalwear Choices
Atlanta’s humid climate creates unique challenges for formal fashion throughout much of the year. Long gowns can trap heat and restrict movement during outdoor ceremonies under direct sunlight. Temporary hems help improve airflow around the legs while reducing fabric weight near the feet. As a result, guests remain more comfortable during extended celebrations. Comfort plays a major role in fashion decisions for southern weddings.
Rain showers also occur frequently in Atlanta, especially during spring and summer wedding seasons. Wet sidewalks, muddy gardens, and slippery pathways can quickly ruin long gown hems. Temporary adjustments allow guests to raise dress lengths when weather conditions become unpredictable. Many attendees appreciate having adaptable options during outdoor receptions and venue transitions. This weather flexibility continues driving demand for temporary hem solutions.
Another uncommon but important factor involves Atlanta’s transportation culture during weddings. Guests often move between hotels, ceremony sites, and reception venues using rideshares or shuttle buses. Long gowns become difficult to manage while entering vehicles repeatedly throughout the evening. Temporary hems help reduce tripping hazards and fabric wrinkles during travel. This practical convenience often goes unnoticed in other fashion discussions but strongly influences guest preferences in Atlanta.
Social Media and Modern Wedding Fashion Trends
Social media platforms continue shaping how wedding guests approach event fashion today. Many attendees want gowns that photograph beautifully while remaining practical enough for dancing and movement. Temporary hemming allows guests to customize dress length for different shoes, poses, and venue styles. Consequently, outfits appear more polished across social media photos and videos. Online fashion culture has increased awareness of adaptable styling methods.
Fashion influencers also promote versatile clothing choices instead of single-use formalwear purchases. Articles discussing innovative materials exploring the future of apparel have encouraged consumers to think more practically about garment functionality. Many guests now value reusable and adjustable fashion options over permanently altered pieces. Temporary hem methods align perfectly with this growing mindset. Sustainable fashion awareness continues influencing purchasing behavior in Atlanta.
Practical Tips for Using Temporary Hem Solutions Successfully
Wedding guests should always test temporary hem products before the actual event day. Practicing the process ensures the gown remains secure during walking, sitting, and dancing. Different fabrics react differently to tapes and clips, so preparation helps avoid wardrobe malfunctions. Therefore, testing the hem solution at home saves unnecessary stress later. A short trial run improves confidence and comfort significantly.
Choosing the correct shoe height before adjusting the hem also matters greatly. Many guests make mistakes by changing shoes after applying temporary alterations. This can create uneven lengths or increase tripping risks throughout the event. Guests should finalize accessories and footwear before securing the hemline permanently for the evening. Careful preparation leads to smoother results.
It also helps to carry a small emergency kit during weddings in Atlanta. Useful items include fashion tape, mini scissors, safety pins, stain wipes, and extra clips. Since outdoor venues and long celebrations create unpredictable situations, quick fixes become extremely valuable. Many experienced wedding guests keep these items in compact evening bags for convenience. Preparedness prevents small fashion issues from becoming major distractions.
Temporary Hem Solutions Support Sustainable Fashion
Sustainability has become increasingly important within the fashion industry over recent years. Many consumers now prefer extending the lifespan of formalwear instead of purchasing new gowns repeatedly. Temporary hems support this goal by allowing dresses to remain versatile for multiple occasions. Guests can wear the same gown at weddings, galas, and formal dinners with different styling adjustments. This reduces unnecessary fashion waste significantly.
Atlanta’s younger professionals especially embrace reusable fashion strategies for environmental reasons. Instead of permanently altering dresses for one event, they prefer adaptable solutions that preserve future styling options. Even accessories influence this flexible fashion approach, including styling advice from guides like how to wear a beret that encourage creative wardrobe reuse. Temporary hemming fits naturally into this broader movement toward sustainable personal style. Eco-conscious fashion choices continue gaining momentum across Atlanta.
How Temporary Hemming Improves Guest Confidence
Confidence often determines how much guests enjoy wedding celebrations and social interactions. Constantly stepping on a gown can create anxiety and discomfort throughout the event. Temporary hem solutions help guests walk naturally and focus on enjoying the occasion instead of adjusting their dress repeatedly. Consequently, attendees feel more relaxed during ceremonies, photos, and dancing. Comfort directly supports better confidence and social experiences.
Guests also appreciate the freedom to move comfortably between different wedding activities. From cocktail hours to crowded dance floors, flexible gown lengths improve mobility significantly. Temporary adjustments provide practical support without sacrificing elegance or sophistication. Many Atlanta guests now consider temporary hemming an essential part of event preparation. This small adjustment can dramatically improve the overall wedding experience.
Conclusion
Wedding guests in Atlanta increasingly prefer temporary hem solutions because they combine comfort, practicality, affordability, and style. From humid weather to outdoor venues and busy transportation schedules, Atlanta weddings create unique fashion challenges that temporary hems solve effectively. These solutions also support sustainable fashion habits while protecting expensive gowns from unnecessary damage. If you plan to attend a wedding in Atlanta soon, consider temporary hemming methods before investing in permanent alterations. Explore more adaptable fashion ideas and styling inspiration through guides like how to wear a beret to build a smarter and more flexible formal wardrobe.
FAQs
Are temporary hem solutions safe for delicate fabrics?
Yes, most fashion tapes and removable hem products work safely on delicate fabrics when used correctly.
Can temporary hems last through an entire wedding reception?
Yes, quality hem tape and hidden clips usually stay secure during long ceremonies and receptions.
Do temporary hem methods damage rental gowns?
No, most temporary solutions remove cleanly without leaving permanent marks or fabric damage.
Which temporary hem method works best for outdoor weddings?
Hidden clips and strong fashion tape usually perform best during outdoor events with uneven surfaces.
Why are temporary hems popular specifically in Atlanta?
Atlanta’s humid weather, outdoor venues, and active wedding culture make flexible gown adjustments especially practical.
Six Common Aerospace Surface Treatments
The aerospace sector needs coatings that can withstand high temperatures and friction. These components are a high corrosion risk, so protective films need to be hard and thermally resistant.
Anodising
Anodising converts a base metal surface through an electrochemical or electrolytic process. It achieves a lasting, rust-resistant layer that’s often attractive enough to act as a decorative feature. It also achieves an insulated surface.
Passivisation
If you want to avoid electrolytic processes, passivisation is an option that removes free iron from stainless steel. This forms an oxide film. There are eight kinds.
Shot Peening
Shot peening is one of the best aerospace surface treatments for resisting metal fatigue. It can be used on glass, steel, or ceramics and is achieved through a cold-working, mechanical process.
Thermal Spray Coatings
Businesses such as www.poeton.co.uk/about/industries/aerospace-defence use thermal coatings as a heat-resistant shield. However, inherent porosity is an enduring challenge that still needs to be overcome.
Electroplating
Electroplating deposits a layer of metal over another surface, but it’s never quite so simple. Every metal brings its own qualities to your base metal, and not all processes are uniform enough to handle complex geometries.
Conversion Coating
Conversion coating, also known as chemfilm coating, is achieved by exposing a surface to a chemical treatment and preparing the base metal for adhesion. It creates a rust-resistant surface while adding longevity.
The aerospace industry has extreme and exacting needs, so it’s constantly looking for new coatings and treatments. Nano-technology integration and new, lightweight materials will bring exciting advancements over the next decade.
How Learners in Denver, CO Can Turn Poor Grades Into Better Study Decisions

Many students in Denver, CO struggle with disappointing grades at some point in their academic journey. In fact, studies show that nearly 70% of students feel stressed after receiving poor exam results, while more than half admit they do not know how to improve their study habits effectively. However, low scores do not have to define future success. Learners who focus on smart planning and consistent habits often recover quickly and perform much better over time. Building an academic growth mindset after exams can help students make smarter choices and gain confidence in school.
Why Spa Robes Improve Relaxation Experience
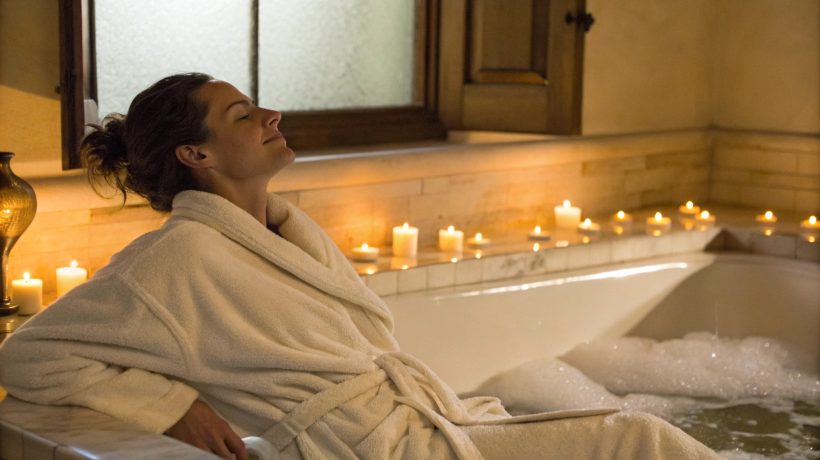
Modern wellness routines focus on comfort, calmness, and stress relief. Many people invest in massages, facials, and wellness therapies to recharge after demanding schedules. However, small details often shape the overall relaxation experience more than expected. A high-quality spa robe creates warmth, softness, and emotional comfort that instantly helps the body feel relaxed.
Best Baby Bath Tub Ideas for Small Bathrooms That Actually Save Space

Most parents realize too late that a bulky plastic tub can take over an entire bathroom floor. A compact baby bathtub solves that problem immediately by giving babies a safe bathing space without turning a tiny bathroom baby setup into daily chaos.
How to Evaluate Mountain Bike Performance Before You Buy

Buying a mountain bike is a big decision. You want a ride that handles well, feels safe, and holds up over time. However, with so many models and price points available, it can be hard to know where to start. The good news is that you do not need to be an expert to make a smart choice. You just need to know what to look for. This guide walks you through the key performance factors to check before you commit to a purchase.
Essential Nail Gun Parts Every Builder Uses in Atlanta, GA

Atlanta’s construction market continues to grow as residential permits and commercial renovations expand across the metro area. According to recent housing industry reports, Georgia remains one of the fastest-growing states for new home development, while power tool usage on construction sites has increased by more than 20% during the past decade. Builders now rely heavily on dependable nail guns to complete framing, roofing, flooring, and finishing jobs faster and with better precision. Many contractors also search for a reliable central pneumatic nail gun parts list when replacing worn components or maintaining older tools. Understanding the most important nail gun parts helps Atlanta builders reduce downtime, improve safety, and extend equipment life during demanding projects.
How to Choose the Best Golf Putter for Beginner Men

The best putter for beginners men is a forgiving, face-balanced mallet putter with clear alignment aids and the correct shaft length for posture and eye position. Models like Odyssey White Hot Versa, TaylorMade Spider, and Cleveland Huntington Beach offer stability, consistency, and confidence on short strokes.
How to Find Sweat-Wicking Golf Hats That Keep You Cool

Spending a long day on the golf course under the summer sun is one of life’s great pleasures. However, heat and sweat can quickly turn an enjoyable round into an uncomfortable one. The right hat makes a bigger difference than most golfers realize. It shields your face, manages sweat, and helps you stay focused on your game. This guide will help you find the perfect sweat-wicking golf hat so you can stay cool from the first tee to the final hole.