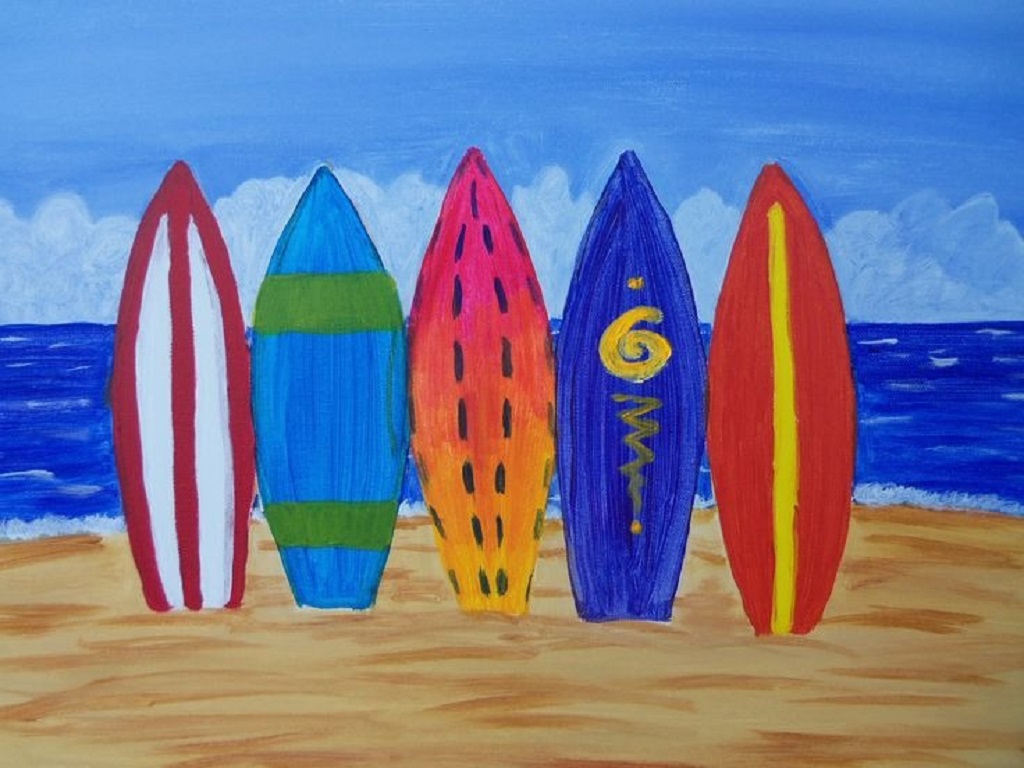
How to Paint a Surfboard to Display as Art: A Beginner’s Creative Guide

How to Stay Technically Sharp in a Non-Technical Job
July 21, 2025iPhone Screen Freezing on Specific Apps
July 23, 2025
Transforming a surfboard into a stunning piece of art is a fun and rewarding project for beginners and creatives alike. Whether you’re a surfer looking to repurpose an old board or an artist seeking a unique canvas, painting a surfboard offers endless possibilities for self-expression. By following a few simple steps, you can create a vibrant, eye-catching display piece that reflects your style. At Cool Surfing Gear, you’ll find inspiration and supplies to kickstart your project. This guide walks you through the process, from gathering materials to adding finishing touches, ensuring your surfboard becomes a masterpiece.
Why Paint a Surfboard for Display?
Surfboards are more than just sports equipment; their sleek shapes and smooth surfaces make them ideal for artistic projects. Turning a surfboard into wall art allows you to showcase your creativity in a unique way. Additionally, it’s an eco-friendly way to repurpose old or damaged boards that might otherwise end up in storage. For beginners, the process is straightforward and doesn’t require advanced artistic skills. If you’re wondering how to paint a surfboard to display as art, this guide provides all the steps to get started with confidence.
Materials You’ll Need
Before diving into the creative process, gather the right materials. Having everything on hand ensures a smooth workflow and professional results. Here’s what you’ll need:
- A clean surfboard (new, used, or retired)
- Sandpaper (medium and fine grit)
- Primer suitable for fiberglass or foam
- Acrylic or spray paint (water-based for safety)
- Paintbrushes, rollers, or spray cans
- Painter’s tape for clean lines
- Clear sealant (polyurethane or epoxy)
- Cleaning supplies (soap, water, and rubbing alcohol)
- Drop cloth or tarp to protect your workspace
- Optional: stencils, stickers, or decals for designs
Most of these items are available at hardware stores or online retailers. For specialty surfboard paints, check trusted sources like Cool Surfing Gear for quality options.
Step-by-Step Guide to Painting Your Surfboard
Step 1: Prepare Your Surfboard
Preparation is key to achieving a smooth, professional finish. Start by cleaning the surfboard thoroughly with soap and water to remove dirt, wax, or oils. For stubborn wax, use a wax comb or rubbing alcohol. Next, lightly sand the surface with medium-grit sandpaper to create a rough texture for paint adhesion. Wipe away dust with a clean cloth. If the board has dings or cracks, repair them with a fiberglass repair kit, available at most surf shops. A well-prepped surface ensures your paint sticks properly and lasts longer.
Step 2: Apply a Primer
Priming creates a uniform base for your paint. Choose a primer designed for fiberglass or foam, depending on your surfboard’s material. Apply a thin, even coat using a brush or spray can, covering the entire surface you plan to paint. Allow the primer to dry completely, which typically takes 4-6 hours. Sand lightly with fine-grit sandpaper to smooth out any imperfections. This step is crucial for vibrant colors and a polished look.
Step 3: Plan Your Design
Before painting, sketch your design on paper or directly on the primed surfboard with a pencil. Consider bold patterns, ocean-inspired themes, or abstract designs that complement the board’s shape. For inspiration, browse sites like HGTV for DIY art ideas. If you’re new to painting, simple geometric shapes or gradients are beginner-friendly. Use painter’s tape to mark off sections for clean lines or stencils for intricate details. Planning ahead saves time and reduces mistakes.
Step 4: Paint Your Surfboard
Now comes the fun part—painting! Use acrylic paints for brushwork or spray paint for a sleek, even finish. Apply thin layers to avoid drips, allowing each layer to dry before adding the next. For vibrant colors, you may need 2-3 coats. If using spray paint, hold the can 8-12 inches from the surface and move in smooth, sweeping motions. Experiment with techniques like blending colors or adding textures with sponges. Be patient and let your creativity shine.
Step 5: Add Details and Accents
Once the base colors are dry, add details to make your surfboard stand out. Use fine brushes for intricate designs, such as waves, florals, or typography. Stickers or decals can add a professional touch without requiring advanced skills. If you make a mistake, wipe it away with a damp cloth before the paint dries or sand lightly and repaint. This step allows you to personalize your board and turn it into a true work of art.
Step 6: Seal Your Artwork
To protect your design and ensure it lasts, apply a clear sealant. Polyurethane or epoxy sealants work well for surfboards, providing a glossy, durable finish. Apply 2-3 thin coats, allowing each to dry fully (check the product instructions for drying times). A sealant shields your artwork from UV rays, dust, and minor scratches, making it ideal for display. For outdoor displays, choose a sealant with UV protection to prevent fading.
Step 7: Display Your Masterpiece
Your painted surfboard is now ready to shine as art! Decide where to display it—popular options include living rooms, patios, or beach-themed spaces. Use wall mounts designed for surfboards, available at retailers like West Elm, for secure hanging. Alternatively, prop the board on a stand for a freestanding display. Ensure the area is well-lit to highlight your design. Your surfboard will become a conversation piece and a testament to your creativity.
Tips for Success
- Work in a well-ventilated area, especially when using spray paint or sealants.
- Test your paint colors on a small area first to ensure they look as expected.
- Keep your workspace clean to avoid dust or debris sticking to wet paint.
- Take breaks between coats to avoid rushing and ensure even drying.
- If you’re unsure about designs, look for inspiration on social media or art blogs.
Common Mistakes to Avoid
Beginners often make simple mistakes that can affect the final result. Avoid over-sanding, which can damage the board’s surface. Don’t skip the primer, as it ensures paint sticks properly. Additionally, avoid thick paint layers, which can drip or crack. Finally, don’t rush the drying process—patience leads to a professional finish. By following these tips, you’ll create a stunning piece of art with ease.
Read More Also: What to Look for in a Corporate Caterer
Conclusion
Painting a surfboard to display as art is a fantastic way to blend creativity with coastal charm. By preparing the board, applying primer, planning a design, and sealing your work, you can transform an ordinary surfboard into a unique masterpiece. This beginner-friendly project requires only basic materials and a touch of imagination. Whether you hang it in your home or gift it to a friend, your painted surfboard will capture attention and showcase your artistic flair. Start today and turn your vision into reality!
Read More Also: Best Travel Clothes for Every Adventure
Frequently Asked Questions
Can I paint a surfboard that’s still used for surfing?
Yes, but ensure the paint and sealant are waterproof and durable. Use marine-grade products to withstand water exposure.
What type of paint is best for a surfboard?
Acrylic or spray paints designed for fiberglass or foam work best. They adhere well and offer vibrant colors.
How long does it take to paint a surfboard?
The process takes 2-3 days, including drying times for primer, paint, and sealant. Rushing can affect quality.
Do I need to remove the fins before painting?
It’s optional, but removing fins makes painting easier and ensures clean edges. Reattach them after sealing.
Can I paint over an old design on a surfboard?
Yes, sand the old design lightly, apply primer, and paint as usual. Ensure the surface is clean for best results.


